You see when you have a lot of photos, it does not make sense to go through each and
every one of them, spend one or two hours micro-dodging and burning them.
image retouching photoshop
You need something fast, right?
So also in this video, I’m going to share with you an action for all of these techniques
to make the process even faster.
I’m super excited to share this with you.
So without any further ado, let’s get started.
Back in the magical world of Photoshop, and if you want to go ahead and download any of
these assets and follow along, you know what to do, check the links in the description.
Now before we begin, I wanted to quickly let you know that the greatest, the most awesome,
the best live Photoshop workshop is happening in just about a week and happening at NARS
Academy absolutely for free.
So I’ll be doing a workshop on the 12 most incredible Photoshop tips that’s going to
change the way you work with Photoshop.
I highly recommend that you attend it.
It’s absolutely free.
You don’t have to pay anything anywhere.
So see you in class.
All right, let’s get back to this video.
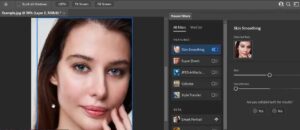
Starting with the first technique, it uses the latest and hopefully the greatest AI feature
in Photoshop, and that is skin smoothing.
So all you need to do for that is make a copy of the background layer or your subject layer
by pressing Ctrl or Command J. Don’t worry, I’m going to be sharing an action for it.
But it’s important for us to understand how all of this works.
Once you make a copy, let’s go to Filter and then Neural Filters.
Inside of that, all you need to do is to turn on Skin Smoothing.
That’s all.
So let’s turn on Skin Smoothing.
And the lesser the blur there is, the more the skin texture and the pores you will see.
Smoothness controls how much you want to even out the skin tones.
So first of all, let’s take the smoothness all the way to the right hand side and let’s
see what it does.
So as you can see, there’s a lot of skin tone evening out.
If you decrease the smoothness, you will notice that the skin tone doesn’t even out that
much.
And I’m going to share with you the before and after.
If you just zoom in.
Let me share this with you.
So here’s the before.
And here is the after.
If you do increase the smoothness, you will notice the evening out will increase substantially.
Have a look.
Did you notice that?
You need to do it yourself to notice it even more.
All right.
Now the blur controls how much of the pores you will see.
So if the blur is less, you will see all the skin texture, all the pores in right there.
If the blur is too much, you will see less of the pores.
Have a look.
Can you tell the difference?
So, I usually keep it at the middle, but this value will change according to your personal
taste and your image.
So for this one, let’s keep the blur at 50 and smoothness all the way to the right hand
side.
Also, make note in the output dropdown, let’s choose smart filter so that you can come back
and change the values later.
Hit OK once you’re satisfied with values.
Now, anytime you want to go back and change the values, you double click on Neural Filters
and you can change the blur or the smoothness value.
Make sure it is still smart object and then hit OK.
Now it is applying all over.
By the way, if you don’t want to see the smart filters, you can always collapse that.
And if you want to see that back again, you can click on this arrow to show it.
All right.
Now, hold the Alt key or the Option key and then click on the Mask button.
This creates a negative mask, that is a mask with black.
Now, what happens with masks?
Black hides and white shows.
So let’s go ahead and select the mask, take the brush white as the foreground color and
just paint over the areas where you do want to soften the skin and repair it.
There we go.
go away.
We’re going to take care of that later.
But for right now, just do this and you are pretty much good to go.
And this is for quick edits.
You don’t have to do much, just a little here and there.
And that’s all.
Let’s take a look at the overall before and after.
So here’s the before.
Here’s the after.
Look at the improvement.
Isn’t that amazing?
Now, there are some areas which you might want to repair even further.
For that, you can go ahead and create a brand new layer.
You can take the regular healing brush tool or the spot.
That’s absolutely up to you.
I’m going to go ahead and choose the regular healing brush tool.
Make sure sample is current and below.
Just simply sample from right here and paint right over there.
Sample from right here again.
By the way, hold the alt key or the option key and click to sample and then paint here.
Easy fix.
And you can do it for the other areas and there isn’t much to do actually.
So how do we do it with an action?
Well, pretty simple.
I’ve created the action for you.
Again, check the links in the description to download them.
So let’s open up actions.
If you cannot see it, let’s go to window and make sure actions is checked.
To install the action, click on the grid right there and then choose load actions and
then you can locate the action and load it right here.
This is the action that you will download.
It is Picsimperfect Skin Treatment.
Let’s open that up.
And this is the first one that we did.
Neural Skin Smoothing.
All you got to do is to just apply it.
It will do everything for you.
It will apply the neural filter, create the negative mask and also select the brush for
you.
So right now, the spot healing brush tool, the regular healing brush tool actually was
selected.
Now have a look.
You can see the brush is selected and all you have to do is to just paint over the areas.
That’s all.
See how simple that is.
And after that, of course, you can go ahead and create a brand new layer and then remove
the extras.
But it just makes your process so much more faster.
And if you do want a customizable action, then you can open this action up and wherever
it says Neural Filter, just click on this box, turn this on.
Now when you play this action, what will happen is whenever it applies the neural filter,
it will open up the Neural Filter’s dialog box so that you can change the values according
to your image or your taste.
And once you’re ready, just make sure the output is set to Smart Filter and then hit
Rest, it will do automatically.
There you go.
You have the black mask, you have the brush.
Why does the foreground color?
Just paint.
Moving on to the second method, and this is pretty classic, pretty old, but works like
a charm.
And here it is.
I actually talked about it four or five years ago in this video.
I don’t recommend watching it because this is the updated version.
First of all, make a copy of the background layer here as well by pressing Control or
Command J, then invert it by pressing Control or Command I, and then set the blend mode
from Normal to Vivid Light.
That’s it.
Now you can name it whatever you want.
You can name it Softening, Smoothing, that’s up to you.
And here’s the twist that we didn’t talk about four years ago, and that is convert it into
a Smart Object by going to Filter and then Convert for Smart Filters.
And this is the most important because you may change your mind and change the values
later.
You may look at your work a year later and you look at it and say, what the hell was
I thinking?
Why the hell did I add so much more softening in this?
You might want to go back and change the values and still have control over your younger self.
How cool is that?
Now let’s go to Filter, Other and then High Pass.
Whatever value you choose, watch carefully.
So let’s zoom in and decrease the radius slowly and gradually increase it to the point where
the irregularities in the skin go away.
For this example, I think 40 would be a good number.
The next step is applying Gaussian Blur.
Let’s go to Filter, Blur and then Gaussian Blur.
Decrease the radius all the way to the left hand side, slowly and gradually increase it
and stop at just the point where you begin to see the irregularities.
So this is used to bring the texture back.
So we are bringing the texture back, but we don’t want to bring it too much that all of
the irregularities come back.
So I think for this example, 9.6 or 9.8 would be perfect.
And then you do the same thing.
Hit the Alt key, the Option key, click on the Mask button, creates a negative mask,
take the brush and just paint over the irregularities. That’s all.
See how awesome this is?
Now again, there will be areas like this because this was too much.
You can remove it using the Spot Healing Brush Tool or the regular Healing Brush Tool.
That’s up to you.
But in most cases, you don’t even have to do it.
This was an extreme example.
There you go.
Want to have a look at the before and after?
I’m going to do some areas here as well.
All right, there you go.
How quick was that?
So here’s the before.
Here’s the after.
Just look at it.
Just look at it.
Again, you don’t have to do any of this.
All of this can happen automatically with the help of the action.
So let’s open up our action.
Once you load the action, the second one is the classic one.
Just play it.
Now it will come up with high pass.
It will ask you what value would work best for your image.
So adjust the slider accordingly and hit OK.
The next value will show up.
This is Gaussian Blur.
Adjust accordingly and stop just at the point where the irregularities start showing up
and then hit OK.
And then it will create a negative mask for you.
Brush is selected.
Just start painting.
That’s all.
Moving on to the third and the final technique.
And this is one of my favorite because it gives you the best results fast.
Now, it’s not my favorite when it comes to doing it manually, dodging and burning.
But when I don’t have the time, this is actually the best.
The only thing to it is that it costs a premium, but it’s not that expensive when you look
at the use case.
We’re going to get to it later.
But for right now, let’s take a look at how it works.
I highly recommend this for professionals.
First of all, as usual, let’s make a copy of the background layer by pressing Control
or Command J. And the plugin that we’re talking about is Retouch For Me series.
So let’s go to Filter and there are a couple that I recommend.
Let’s go to Filter, Retouch For Me.
And this is the one that I recommend, that is Heal.
Let’s select that and it just automatically detects all the blemishes and removes them.
Let’s make it larger so that I can see, zooming in, here’s the before and here is the after.
Take a look.
Isn’t that fantastic?
And also you can control the sensitivity of it.
You can control how much of the blemishes you want to remove.
So as you decrease or increase the sensitivity, it’s going to show you where it is removing
the blemishes from.
So I usually keep the sensitivity all the way to 100.
If you want to keep it natural, you can also decrease it according to your choice.
I keep it this way.
And once you’re okay with the values, make sure you have checked Make Mask and then hit
Apply.
That way only those areas would be covered in a new layer.
Have a look at this layer.
It only has those covered areas, right?
So here’s the before, here’s the after.
Now that is gone, but not completely gone.
What is the next step?
Let’s create a stamp visible layer by pressing Ctrl Alt Shift and E. And again, you don’t
have to do any of this.
There’s an action for it.
Right now I’m just showing you how it works.
So now let’s go to Filter, Retouch for me and this is the second one that I recommend
and that is Dodge and Burn.
Also it does it automatically and that too, it will be in layers.
It will be in a soft light layer.
You’ll be able to see which areas is it dodging and which areas is it burning.
Let’s take a look at it, my friend.
This is just amazing.
So here’s the before, here’s the after.
Look, it’s also working on the body.
So if we zoom in, here’s the before, here is the after.
It is just magnificent.
And of course you can control the amount of it.
So usually by default it is at 100.
You can have it lower, you can have it higher, that’s up to you.
I’m keeping for this one at about 128 and make sure you have checked Soft Light Layer if you want that and hit Apply.
That way you will have a gray layer and have a look, these areas have been dodged, there
are these areas which have been burned.
Now all you have to do is to change the blend mode from Normal to Soft Light and there you
go.
And the greatest part about this is that you can just make changes accordingly.
If you feel that you need to dodge some areas, you can do it.
It’s a gray layer.
And after that, of course, if you want some additional contouring, you can press Control
Alt Shift and E. This creates a stamp visible layer again.
Let’s go to Filter, Retouch for me again.
And this is the third one that I recommend, Retouch for me Portrait Volumes.
So I highly recommend getting this Trinity.
It adds depth to your portrait.
So here’s the before, see, and here’s the after, all the way to the right hand side.
Now this looks kind of fake, so we’re going to keep it in the middle at about 100.
Of course, if you want a Soft Light Layer, you can opt to have it and hit Apply.
And there you go, my friend.
Have a look at the contouring.
Looks 3D, doesn’t it?
So all you got to do again is to change the blend mode to Soft Light and there you have
it.
Now, let’s have a look at the before and after.
We didn’t even do a thing.
All of it was automatic.
So here’s the before, here is the after.
Whoa, that is just amazing.
Now I understand to some of you this might sound expensive and that’s why I shared with
you the first and the second technique, but it’s actually not.
If you are a professional, you will recover the cost of this fantastic time saving automatic
skin retouching plugin in less than one shoot.
And you don’t even have to do all of this.
All you got to do, I’m going to give you the action, just play it.
The action is Skin Full Treatment.
Just play it.
You can keep your pen and it will do everything automatically.
It will properly create the layers, name the layers, do everything for you and it’s done.
We didn’t even have to do anything.
Have a look.
We have the Depth layer, we have the Dodge and Burn layer, we have the Blemishes layer.
Everything is in place.
So I found these plugins four months ago and back then I asked them if they could give.
And I highly, highly recommend it for professionals.
So those, my friend, are the three ways, three super fast ways to repair skin in Photoshop.
Let us do a quick little recap.
For the first technique, we used Neural Filter Skin Smoothing.
Do not forget to convert the layer into a smart object.
And also we applied a black mask and only painted on the areas where we needed it.
For further corrections, you can, of course, apply the Spot Healing Brush Tool or the regular
Healing Brush Tool.
That’s absolutely up to you.
For the second technique, we made a duplicate of the background layer, inverted it, changed
the blend mode to Vivid Light, of course, then converted the layer into a smart object,
applied High Pass just to the point where all of the irregularities of the skin go away.
Then applied Gaussian Blur just to the point where the irregularities begin to appear.
And that’s all.
Again, only applied it in areas where we need it.
For the third example, for the third technique, actually, we used the Retouch For Me plugins.
That gives you the best result, but costs a premium.
Absolutely worth it if you are a professional.
If you are interested in it, you can check the link in the description to get discounts
for it.
And that’s pretty much it for this video.
I hope you enjoyed it.
And if you did, make sure to give us a like and also don’t forget to subscribe and not
just subscribe, ring the bell so that you, my friend, don’t miss any other future tips,
I would like to take this moment to thank all these nice and amazing people for supporting
Until then, make sure that you keep creating. You need something fast, right?
So also in this video, I’m going to share with you an action for all of these techniques
to make the process even faster.
I’m super excited to share this with you.
So without any further ado, let’s get started.
Back in the magical world of Photoshop, and if you want to go ahead and download any of
these assets and follow along, you know what to do, check the links in the description.
Now before we begin, I wanted to quickly let you know that the greatest, the most awesome,
the best live Photoshop workshop is happening in just about a week and happening at NARS
Academy absolutely for free.
So I’ll be doing a workshop on the 12 most incredible Photoshop tips that’s going to
change the way you work with Photoshop.
I highly recommend that you attend it.
It’s absolutely free.
You don’t have to pay anything anywhere.
So see you in class.
All right, let’s get back to this video.
Starting with the first technique, it uses the latest and hopefully the greatest AI feature
in Photoshop, and that is skin smoothing.
So all you need to do for that is make a copy of the background layer or your subject layer
by pressing Ctrl or Command J. Don’t worry, I’m going to be sharing an action for it.
But it’s important for us to understand how all of this works.
Once you make a copy, let’s go to Filter and then Neural Filters.
Inside of that, all you need to do is to turn on Skin Smoothing.
That’s all.
So let’s turn on Skin Smoothing.
And the lesser the blur there is, the more the skin texture and the pores you will see.
Smoothness controls how much you want to even out the skin tones.
So first of all, let’s take the smoothness all the way to the right hand side and let’s
see what it does.
So as you can see, there’s a lot of skin tone evening out.
If you decrease the smoothness, you will notice that the skin tone doesn’t even out that
much.
And I’m going to share with you the before and after.
If you just zoom in.
Let me share this with you.
So here’s the before.
And here is the after.
If you do increase the smoothness, you will notice the evening out will increase substantially.
Have a look.
Did you notice that?
You need to do it yourself to notice it even more.
All right.
Now the blur controls how much of the pores you will see.
So if the blur is less, you will see all the skin texture, all the pores in right there.
If the blur is too much, you will see less of the pores.
Have a look.
Can you tell the difference?
So, I usually keep it at the middle, but this value will change according to your personal
taste and your image.
So for this one, let’s keep the blur at 50 and smoothness all the way to the right hand
side.
Also, make note in the output dropdown, let’s choose smart filter so that you can come back
and change the values later.
Hit OK once you’re satisfied with values.
Now, anytime you want to go back and change the values, you double click on Neural Filters
and you can change the blur or the smoothness value.
Make sure it is still smart object and then hit OK.
Now it is applying all over.
By the way, if you don’t want to see the smart filters, you can always collapse that.
And if you want to see that back again, you can click on this arrow to show it.
All right.
Now, hold the Alt key or the Option key and then click on the Mask button.
This creates a negative mask, that is a mask with black.
Now, what happens with masks?
Black hides and white shows.
So let’s go ahead and select the mask, take the brush white as the foreground color and
just paint over the areas where you do want to soften the skin and repair it.
There we go.
go away.
We’re going to take care of that later.
But for right now, just do this and you are pretty much good to go.
And this is for quick edits.
You don’t have to do much, just a little here and there.
And that’s all.
Let’s take a look at the overall before and after.
So here’s the before.
Here’s the after.
Look at the improvement.
Isn’t that amazing?
Now, there are some areas which you might want to repair even further.
For that, you can go ahead and create a brand new layer.
You can take the regular healing brush tool or the spot.
That’s absolutely up to you.
I’m going to go ahead and choose the regular healing brush tool.
Make sure sample is current and below.
Just simply sample from right here and paint right over there.
Sample from right here again.
By the way, hold the alt key or the option key and click to sample and then paint here.
Easy fix.
And you can do it for the other areas and there isn’t much to do actually.
So how do we do it with an action?
Well, pretty simple.
I’ve created the action for you.
Again, check the links in the description to download them.
So let’s open up actions.
If you cannot see it, let’s go to window and make sure actions is checked.
To install the action, click on the grid right there and then choose load actions and
then you can locate the action and load it right here.
This is the action that you will download.
It is css garphic media Skin Treatment.
Let’s open that up.
And this is the first one that we did.
Neural Skin Smoothing.
All you got to do is to just apply it.
It will do everything for you.
It will apply the neural filter, create the negative mask and also select the brush for
you.
So right now, the spot healing brush tool, the regular healing brush tool actually was
selected.
Now have a look.
You can see the brush is selected and all you have to do is to just paint over the areas.
That’s all.
See how simple that is.
And after that, of course, you can go ahead and create a brand new layer and then remove
the extras.
But it just makes your process so much more faster.
And if you do want a customizable action, then you can open this action up and wherever
it says Neural Filter, just click on this box, turn this on.
Now when you play this action, what will happen is whenever it applies the neural filter,
it will open up the Neural Filter’s dialog box so that you can change the values according
to your image or your taste.
And once you’re ready, just make sure the output is set to Smart Filter and then hit
OK.
That’s all.
Rest, it will do automatically.
There you go.
You have the black mask, you have the brush.
Why does the foreground color?
Just paint.
Moving on to the second method, and this is pretty classic, pretty old, but works like
a charm.
And here it is.
I actually talked about it four or five years ago in this video.
I don’t recommend watching it because this is the updated version.
First of all, make a copy of the background layer here as well by pressing Control or
Command J, then invert it by pressing Control or Command I, and then set the blend mode
from Normal to Vivid Light.
That’s it.
Now you can name it whatever you want.
You can name it Softening, Smoothing, that’s up to you.
And here’s the twist that we didn’t talk about four years ago, and that is convert it into
a Smart Object by going to Filter and then Convert for Smart Filters.
Hit OK.
And this is the most important because you may change your mind and change the values
later.
You may look at your work a year later and you look at it and say, what the hell was
I thinking?
Why the hell did I add so much more softening in this?
You might want to go back and change the values and still have control over your younger self.
How cool is that?
Now let’s go to Filter, Other and then High Pass.
Whatever value you choose, watch carefully.
So let’s zoom in and decrease the radius slowly and gradually increase it to the point where
the irregularities in the skin go away.
For this example, I think 40 would be a good number.
Hit OK.
The next step is applying Gaussian Blur.
Let’s go to Filter, Blur and then Gaussian Blur.
Decrease the radius all the way to the left hand side, slowly and gradually increase it
and stop at just the point where you begin to see the irregularities.
So this is used to bring the texture back.
So we are bringing the texture back, but we don’t want to bring it too much that all of
the irregularities come back.
So I think for this example, 9.6 or 9.8 would be perfect.
Hit OK.
And then you do the same thing.
Hit the Alt key, the Option key, click on the Mask button, creates a negative mask,
take the brush and just paint over the irregularities.
That’s all.
See how awesome this is?
Now again, there will be areas like this because this was too much.
You can remove it using the Spot Healing Brush Tool or the regular Healing Brush Tool.
That’s up to you.
But in most cases, you don’t even have to do it.
This was an extreme example.
There you go.
Want to have a look at the before and after?
I’m going to do some areas here as well.
All right, there you go.
How quick was that?
So here’s the before.
Here’s the after.
Just look at it.
Just look at it.
Again, you don’t have to do any of this.
All of this can happen automatically with the help of the action.
So let’s open up our action.
Once you load the action, the second one is the classic one.
Just play it.
Now it will come up with high pass.
It will ask you what value would work best for your image.
So adjust the slider accordingly and hit OK.
The next value will show up.
This is Gaussian Blur.
Adjust accordingly and stop just at the point where the irregularities start showing up
and then hit OK.
And then it will create a negative mask for you.
Brush is selected.
Just start painting.
That’s all.
Moving on to the third and the final technique.
And this is one of my favorite because it gives you the best results fast.
Now, it’s not my favorite when it comes to doing it manually, dodging and burning.
But when I don’t have the time, this is actually the best.
The only thing to it is that it costs a premium, but it’s not that expensive when you look
at the use case.
We’re going to get to it later.
But for right now, let’s take a look at how it works.
I highly recommend this for professionals.
First of all, as usual, let’s make a copy of the background layer by pressing Control
or Command J. And the plugin that we’re talking about is Retouch For Me series.
So let’s go to Filter and there are a couple that I recommend.
Let’s go to Filter, Retouch For Me.
And this is the one that I recommend, that is Heal.
Let’s select that and it just automatically detects all the blemishes and removes them.
Let’s make it larger so that I can see, zooming in, here’s the before and here is the after.
Take a look.
Isn’t that fantastic?
And also you can control the sensitivity of it.
You can control how much of the blemishes you want to remove.
So as you decrease or increase the sensitivity, it’s going to show you where it is removing
the blemishes from.
So I usually keep the sensitivity all the way to 100.
If you want to keep it natural, you can also decrease it according to your choice.
I keep it this way.
And once you’re okay with the values, make sure you have checked Make Mask and then hit
Apply.
That way only those areas would be covered in a new layer.
Have a look at this layer.
It only has those covered areas, right?
So here’s the before, here’s the after.
Now that is gone, but not completely gone.
What is the next step?
Let’s create a stamp visible layer by pressing Ctrl Alt Shift and E. And again, you don’t
have to do any of this.
There’s an action for it.
Right now I’m just showing you how it works.
So now let’s go to Filter, Retouch for me and this is the second one that I recommend
and that is Dodge and Burn.
Also it does it automatically and that too, it will be in layers.
It will be in a soft light layer.
You’ll be able to see which areas is it dodging and which areas is it burning.
Let’s take a look at it, my friend.
This is just amazing.
So here’s the before, here’s the after.
Look, it’s also working on the body.
So if we zoom in, here’s the before, here is the after.
It is just magnificent.
And of course you can control the amount of it.
So usually by default it is at 100.
You can have it lower, you can have it higher, that’s up to you.
I’m keeping for this one at about 128 and make sure you have checked Soft Light Layer
if you want that and hit Apply.
That way you will have a gray layer and have a look, these areas have been dodged, there
are these areas which have been burned.
Now all you have to do is to change the blend mode from Normal to Soft Light and there you
go.
And the greatest part about this is that you can just make changes accordingly.
If you feel that you need to dodge some areas, you can do it.
It’s a gray layer.
And after that, of course, if you want some additional contouring, you can press Control
Alt Shift and E. This creates a stamp visible layer again.
Let’s go to Filter, Retouch for me again.
And this is the third one that I recommend, Retouch for me Portrait Volumes.
So I highly recommend getting this Trinity.
It adds depth to your portrait.
So here’s the before, see, and here’s the after, all the way to the right hand side.
Now this looks kind of fake, so we’re going to keep it in the middle at about 100.
Of course, if you want a Soft Light Layer, you can opt to have it and hit Apply.
So all you got to do again is to change the blend mode to Soft Light and there you have
Now, let’s have a look at the before and after.
We didn’t even do a thing.
All of it was automatic.
So here’s the before, here is the after.
Whoa, that is just amazing.
Now I understand to some of you this might sound expensive and that’s why I shared with
you the first and the second technique, but it’s actually not.
If you are a professional, you will recover the cost of this fantastic time saving automatic
skin retouching plugin in less than one shoot.
And you don’t even have to do all of this.
All you got to do, I’m going to give you the action, just play it.
The action is Skin Full Treatment.
Just play it.
You can keep your pen and it will do everything automatically.
It will properly create the layers, name the layers, do everything for you and it’s done.
We didn’t even have to do anything.
More details in the description.
And I highly, highly recommend it for professionals.
So those, my friend, are the three ways, three super fast ways to repair skin in Photoshop.
Let us do a quick little recap.
For the first technique, we used Neural Filter Skin Smoothing.
Do not forget to convert the layer into a smart object.
And also we applied a black mask and only painted on the areas where we needed it.
For further corrections, you can, of course, apply the Spot Healing Brush Tool or the regular
Healing Brush Tool.
That’s absolutely up to you.
For the second technique, we made a duplicate of the background layer, inverted it, changed
the blend mode to Vivid Light, of course, then converted the layer into a smart object,
applied High Pass just to the point where all of the irregularities of the skin go away.
Then applied Gaussian Blur just to the point where the irregularities begin to appear.
And that’s all.
Again, only applied it in areas where we need it.
For the third example, for the third technique, actually, we used the Retouch For Me plugins.
That gives you the best result, but costs a premium.
Absolutely worth it if you are a professional.
If you are interested in it, you can check the link in the description to get discounts
for it.
And that’s pretty much it for this video.
I hope you enjoyed it.
And if you did, make sure to give us a like and also don’t forget to subscribe and not
just subscribe, ring the bell so that you, my friend, don’t miss any other future tips,
tricks or tutorials.
I would like to take this moment to thank all these nice and amazing people for supporting
clipping service studio on Patron and helping keep clipping service studio free for everybody forever.